Tuesday, January 30, 2018

Wow--Full automation of an astronomical imaging platform for less than $120! -- Part 4


Putting it all together

With all the software installed, it's time to put things together.

Take the compute stick out to the scope:

Step 1: Wire up the hardware. Connect the telescope mount to the compute stick with the RS232 cable and the Serial to USB converter (I used the USB 2 port for this connection). Then connect the imager to the compute stick (I used the USB 3 port for this connection)

Step 2: Power up the mount and the compute stick

On the main computer:

Step 1:  Start up TeamViewer. You'll see the name of the remote computer (enter it, if you don't) and press the Connect button. After several seconds, the login box will appear. Type in the password you set up for the stick's TeamViewer installation. After connection is established, the remote desktop will load. You can now control the stick from your main computer.

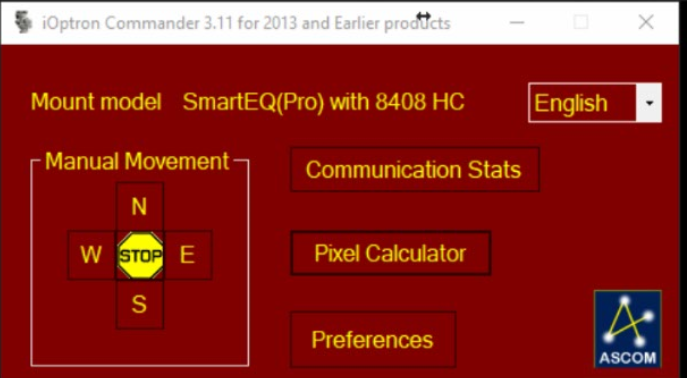
Step 2: Start the ASCOM driver for your mount. The following window appears:

Press OK, and the driver will connect to your mount:


Step 3: Start your planetarium software
(In my case, Sky Tools 3--you can find instructions online for these tasks for your chosen software). 

In ST3, select the Live View tab. 

Move to the Telescope  button and select "configure" from the drop down menu. Select the driver you installed for your mount from the list that appears.

Click on the Telescope button again and select Connect from the drop down menu. ST3 will connect to the scope.


Congratulations!  You can now control your scope from your main computer! 

Step 3: Start you imager software
(In my case, Mallincam Sky). Connect to the imager, and you're in complete control.

At this point, I would go out and align my mount using the polar scope. For many of you, your scope may already be aligned, so you can (of course) skip this step. Because I align every session, I also do a single-star synch to complete the process. I also focus manually. For both of these steps, I take the main computer out to the scope (still mirroring the stick desktop) and perform these tasks. 

Step 4: Start remote imaging!  Go back to the comfort of your house and select an object in ST3. click Slew To, and scope will move to it and the object will appear in the imager. You can use the manual keys on your mount driver to center it, and you can then Synch it using the synch button on the ST3 interface.

The full system:


Wow--Full automation of an astronomical imaging platform for less than $120! -- Part 3

This is the desktop of the remote compute stick out at the scope, displayed and controlled by the computer in my living room. Click on image for a larger view.
The image above shows the fully-functioning system. The top, red window is the ASCOM driver for iOptron talking to the mount. Below it is the Star Tools 3 window. ST3 is connected to the scope via the ASCOM driver, and controls GOTOs and synchs. In this version, the 8 inch, f/3.9 Newt is pointing to the Orion Nebula. The nebula image is captured and displayed via the Mallincam Sky software and the Mallincam imager. Note that I also have SharpCap Pro on the remote computer. I use it with my ASI 120MM imager.

All these programs load and perform very well--even though the compute stick has only 2G of memory. Performance via TeamViewer is excellent, with very low latency.  Given the limited storage of 32G, I would recommend buying a micro SD card (128G is the max for this stick). Even if you do, I would also recommend that you permanently delete the downloads for your software after you have installed it, and also to run a disk clean operation and delete old versions of windows and system files. You will free up a lot of storage

Installation of the various pieces of software is straightforward and simple--I don't need to go into too much detail. Connect the stick to a monitor, add a USB mouse and keyboard and power it up. If it's a new stick, set up Windows first and then download the software packages.

The ASCOM drivers can cause some problems--see the next paragraph.

One note of caution: During installation, the ASCOM platform will tell you that it needs version 3.5 of the .NET framework to function (it will also probably ask for some C++ packages to be installed, but more on that later--don;t worry about it at this time). The ASCOM platform will not install until it sees this package is present. DO NOT DOWNLOAD .NET 3.5 as you can corrupt your installation.  You already have .NET 3.5 on your Windows machine, it is just not activated. To activate .NET 3.5, type "Turn Windows features off and on." You'll see .NET 3.5 at the top of the list in the window that appears. Check the box next to it to turn it on, then start the ASCOM installer again. It will, again, at some point stop and tell you it needs a couple of C++ libraries. Notice that you can click on an option that will allow the ASCOM installer to download and install them for you. Select this option.

When the ASCOM installer is finished, install the ASCOM Driver for your telescope mount and your imager, planetarium software, and, if needed, the remote control software such as TeamViewer (to say nothing of additional packages like focusers, filter wheels, etc., but I might suggest a "heftier" compute stick in such an instance, with at least 4G of memory--but they are significantly more costly ($300 to $400).


If you're using TeamViewer, you'll need to follow the instructions carefully. Set up the stick installation to allow remote control (the second radio button), and the main computer as a basic installation (the top radio button). When you have installed the software on the stick, start teamviewer and note the name assigned to the computer.  Then click on Extras>Options. The following screen will appear:

Add a personal password that is easy to remember. This step will ensure that TeamViewer will require the same password every time you start it up. If you don't do this, the password will change every time you start the program and you won't be able to log in remotely.

Finally, make sure you check the option to have TeamViewer start when Windows starts:


One last thing. You'll need to set up the stick so it logs into windows automatically when it starts. There are many online articles on how to do this, so I won't cover it here. It's easy to do and takes seconds.

One last tip: Make desktop shortcuts for all the software you intend to use on the stick. This step is not necessary (you could add them to the Task Bar, for example), but it makes finding and launching programs a little faster. You could also add them to the Start group, so they start when the compute stick boots, but I prefer not to do this as the stick starts faster if it does not have to also start up several applications.

Power down the stick. The next time we power it up, it will be out at the scope!

In Part 4, we'll tie the system together and get it working!


Monday, January 29, 2018

Wow--Full automation of an astronomical imaging platform for less than $120! -- Part 2


My first image captured and stacked with the fully-automated system. Conditions were poor and I was imaging through haze and clouds!

The Goal: The goal of this project is to create a fully-automated imaging platform in which all components and processes can be fully controlled from a "remote" location. In my case, I want to sit in the comfort of my living room and control my driveway scope, but it could just as easily be a scope in a remote observatory building where a computer controls dome/roof functions in addition to the scope/imager. We will accomplish this goal by loading all the software necessary to control the scope and imager on a "remote" compute stick that "lives" with the scope, and loading software to control that remote compute stick from the "main" computer in our living room or other preferred location. We will be able to see the compute stick desktop on our main computer, and to launch programs and use it as if it was sitting right in front of us, instead of at the remote location.

In addition to the hardware described in Part 1, you'll need appropriate hardware and several packages of software to support your automation project.

Hardware:

  • A computer controllable, ASCOM-compliant mount (most GOTO mounts meet this requirement. In my case, I have 3 mounts I use regularly that meet this requirement--and LX-200 and two iOptron mounts: the ZEQ 25 and the Smart EQ Pro
  • A "main" computer (desktop, laptop, or netbook) that runs at least Windows 7. I use Windows 10. This is the computer you will use to talk to the scope controller computer
  • A "compute stick" that also runs Windows (in this case Windows 10 Home edition). Please see Part 1 for the specifications of the stick I use. I would make sure that the stick supports this specification. 2 USB ports (at least one at 3.0) are optimal, although you could use a powered USB hub if the stick only has one
  • A serial cable designed to talk to your mount. Most manufacturers make these cables, but it's also very easy to make one, and you can find wiring diagrams for your mount online. It took me 30 seconds to make one for the iOptron mount using a 4-wire phone cable and a serial port with a modular plug with "push on" wires.
  • A USB to serial converter so that the serial cable can talk to your compute stick
  •  Your imager and its USB imaging cable
  • Other hardware you may wish to use--for example, a focuser.
Software:

The good news is that you can build your system with completely free software, if you wish! Here's what you need:
  • Planetarium software that will enable you to "drive" your scope to objects in the sky. Stellarium is an example of a free package. I use Sky Tools 3 Pro, but there are a number of packages you can use, such as Cartes du Ciel (also free at the time of writing)
  • ASCOM platform software. Some planetarium software can drive certain mounts "natively." That is, they have all the necessary drivers to talk to your telescope via the serial control cable. Many mounts do not, but they can talk to the planetarium software via an ASCOM (AStronomy Common Object Model) driver. ASCOM allows mounts, focusers, cameras, etc. to talk to each other. You will need to download the standard ASCOM platform from the ASCOM site (https://ascom-standards.org/) if your mount is not natively supported by the planetarium software
  • ASCOM driver for your mount. You'll find this on you mount manufacturer's website. This software talks to the ASCOM platform, which enables the mount to connect with and communicate with the planetarium software (and other devices, such as autoguiders, if needed). Make sure you download the software specific to your mount model. many manufacturers maintain a number of ASCOM drivers, each tailored to a specific model they sell
  • Driver software for the USB to serial converter. You can find the latest version on the manufacturer's website. Some USB to serial converters are better than other, so I would suggest doing a little research. Check your mount's manufacturer website as they may have specific recommendations
  • Software that will enable you to control the compute stick from your remote, main computer. There are a number of free packages you can use for this purpose. This software runs on the compute stick and on the main computer. Windows Remote Control is a very good package, and it is bundled with Windows. However, it is not bundled with the Win10 Home edition that runs on my compute stick. There are workarounds, but I decided to use TeamViewer instead, which is free for personal use and has many useful features
  • Your imager's driver and imaging software.  Windows-based.
  • Software to control any additional hardware (such as a focuser, etc.)
To download the software, connect your stick to the HDMI port on a monitor and add a USB mouse and keyboard. If you're using the same network to download your software as you will be using to drive your scope, make sure that you set the automatic logon option. If it's not, be sure to log in to the scope control network you plan to use and set it so the stick logs in automatically on startup. Remember, you will be running the stick at the scope in "headless" mode. The stick needs to log in to windows, log on to the network, and start TeamViewer automatically, with no intervention from you.

In Part 3, I'll talk about installation and setup.

Wow--Full automation of an astronomical imaging platform for less than $120! -- Part 1

As we shiver through this cold Indiana winter, I have longed more and more for the comfort of my warm living room as I fought my driveway scope with numb fingers.

The answer to my prayers came in the form of a very inexpensive, fully-featured, tiny USB computer--the Intel W5. As small as a Roku stick, it boasts a full Win10 (Home) installation and quad core, Atom processor (1.5 - 1.9 GHz). It can stream 4K video beautifully, too. Memory-wise, it's a little on the small side--2G of RAM and 32G of storage (expandable by another 128G via a mini SSD card). In addition, it supports 2 USB ports (1 USB 3 and 1 USB 2) and 4K HDMI. Connectivity is handled by 802.11 b/g/n (2.4GHz) wi-fi and Bluetooth.

Here are the ZEQ 25 and 8 inch f/3.9 Newt, ready for an imaging session. The tiny compute stick is resting on the scope dolly.
The most amazing part, is that you can get it for less than $120.

This little stick, operating in "headless" mode (i.e., no monitor or keyboard attached) forms the core of a system which automates my ZEQ 25 mount and imaging system, allowing me to control the scope and the imager from anywhere I can access my home network. In fact, there's nothing to stop this system working fully remote from a distant location hundreds, or even thousands of miles away, with very few changes. As a bonus, the same program set will also work with my SmartEQ Pro, so I can simply connect it up to that mount and enjoy the same level of automation.

It took me about 2 hours to install the software I needed (all free!) and set it up. The result is very pleasing--latency is low across my network and the scope is well-behaved as it slews across the sky. The only problem I have is that it does not have the USB power required to use some of my larger, single cable imagers. I tried, but they crash the computer due to their power requirements. However, a simple and inexpensive powered USB hub will solve that issue. For large cameras with separate power cables, and for smaller imagers, it works just fine.

In Part 2, I'll run down the list of hardware and software you'll need if you want to do this, and in Part 3, I'll talk about some of the software installation concerns. In Part 4, we'll get all the components working together. But don't worry--the job might seem complicated, but it's not. Everything came together for me very quickly and with few complications and I can now enjoy astroimaging in the warm! On top of that, it's a great project for a cold and snowy day or cloudy evening.

Isn't technology wonderful?

Saturday, January 6, 2018

Jupiter-Mars Conjunction 1-6-2018

We had balmy -15F temperatures with -24F wind chills here in Indiana this morning, so setting up a scope for this event was something I didn't even attempt (there are reports of scope cables actually SNAPPING in this cold--certainly the power cords in my garage seem to be frozen stiff). I did stick my head out of the door, though, and snapped this picture with my phone. I was amazed at how visible the event was in a sky that was fairly bright (I slept in after a late night; if my son had not woken me to get a ride to work, I would have missed it all together, so thank you, Scott!).

In the image, Jupiter and Mars are less than 0.2 degrees apart (about 18 arcminutes). The conjunction officially occurs tomorrow, January 7, but it's likely to be cloudy, so today's image is probably the only one I'll be able to get. Jupiter is the larger, whiter object (mag. -1.8), while Mars, much fainter (mag. 1.4), is to its right. The last time the planets were this close in the sky was about 20 years ago, and the next opportunity to see them this close will be 33 years from now, so it's a twice in a lifetime even for most people.

Cropped Image 


Widefield View


Tuesday, January 2, 2018

Messier 42--my Last Image of 2017

It seems almost obligatory at this time of year to post images of M42. The big problem in most images is that it is difficult to prevent the core (the Trapezium Stars) from "blowing out" if you want to capture the fainter and more subtle aspects of the nebulosity. Of course, post processing can correct this problem and many astroimagers capture data at different integration times which they combine with packages such as Photoshop and Pixelinsight.

The image below is a stack of integrations captured so that the Trapezium stars were not completely blown out--a series of 15 x 2-second (!) integrations captured with a Mallincam DSm and 125mm MAK with the Mallincam MFR-II-x focal reducer (about f/7.5). The image is the last one I took in 2017, and also the last one I took with the ZEQ25 before it went in for repair.

I processed the image in Photoshop, but I did nothing special to process the core. The result is quite pleasing, preserving some core detail while showing some of the fainter nebulosity. The strange 'Z' - shaped artifacts on the left size of the image are trails left by geostationary satellites.