Monday, February 25, 2013

Process #3


This first image was processed in PIPP--a great little free package.  2000 frames were cropped and Jupiter was centered.  The output AVI was then processed in Registax and the best 400 frames were stacked and processed.  The final processing was done in Photoshop.


I pre processed the second image with PIPP.  Stacking was greatly simplified and best 700 frames were imported into Registax. This image is composed of about 200 frames from the original 2000.  Final processing was done in Photoshop. I pushed the processing more this time.  More detail emerged, but the image looks "overcooked" to me.


Another Jupiter pic from 12/24

I processed this with a slightly different workflow, doing more adjustments in Photoshop.

Sunday, February 24, 2013

Jupiter Tonight

Conditions for imaging were reasonably good tonight.  Here is a rather rapidly processed pic.  I'll work on the others more intensively and see if I can improve on this effort. The image was captured with the 14 inch with a Lifecam.  2000 frames were captured and the best 20% were stacked and processed in Registax.  Final processing was done in Photohop with multiple iterations of sharpening and noise reduction.

Wednesday, February 20, 2013

The Moon over Palms

I'm in Palo Alto right now, so I thought I'd post some pix of the moon over palm trees.  It'll be something nice to remember when I get back to the single-digit cold of the Midwest! The seeing here is amazing!


Sunday, February 17, 2013

The Sun on February 17, 2013

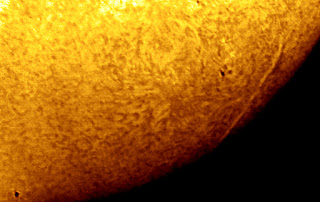
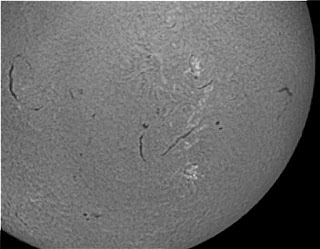
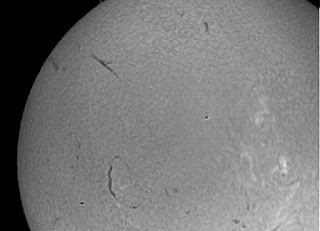
The sun showed a more active face today, with prominences, spots, filaments, and even flares.  AR 1675 is releasing M-Class flares, and we have been able to monitor the effects on the earth's magnetic field with the magnetometer I described in my post yesterday.  Seeing was a little better today than lately, and was able to get some nice images with the PSTDS. I'll be in San Francisco next week, so this blog might be quiet for a few days--unless SF gets hit by a meteorite!

A lovely, snaking, inverted filament


Another huge filament, with (unfortunately) some imaging artifacts

Filaments and bright spots.  The bright area toward the bottom of the image is (I think) AR1675 
An active sun
An inverted view of an active sun

AR1675(?) looking very bright to the left of center

Saturday, February 16, 2013

Happy SUNdae

This is a whimsically reprocessed image of the sun taken on 2.7.13.


A Magnetic Observatory


My daughter is doing a 6th Grade science fair project on the sun.  As part of her project, we decided to establish a magnetic observatory at home by building a soda-bottle magnetometer (Google it and you'll find a number of pages that describe how to build this little device).  This little device is easy to build and incredibly sensitive (a car driving by in the street causes a significant deflection).  It only took us about 30 minutes to build, and, if you choose to build one yourself, the total cost is between $0 and $7.00, depending on what you have available.  Materials include: a soda bottle, drinking straw, bar magnet, small mirror, index card, thread, and sand (or gravel).  We use a laser pointer to put a spot on a meter rule.  Initially, we centered it at 50 cm and we'll measure all our deflections from that spot.  This little instrument will measure even minor flare events on the sun, and it should give us a great "heads up" if there's a big event!  We'll try to take measurements as we can (mostly in the evening), but it's a great project to enable you to observe the sun, even when it is cloudy.  And if the weather's good, a significant deviation can tell you if there's something going on worth breaking out your solar scope for.

The assembled magnetometer

The completed magnetometer with laser spot
The reflected spot on a meter rule about a meter away from the instrument

Friday, February 15, 2013

Mercurial Frustrations

The weather forecast for this evening was for heavy cloud and snow.  And so, of course, it is clear, cold, and breezy.  The day was unremittingly cloudy, but the sun broke through as it began to set.  The idea of imaging Mercury again after capturing a fuzzy image of the planet earlier in the week was tempting.  But that weather forecast had said cloud and snow, so I stayed put.  By 6:45pm, the sky was crystal clear and the sun was below the horizon; I was missing what could be the last opportunity for months to image the planet!  I quickly threw the scope and all the gear into the car and drove off to my imaging site.

It was around 30 degrees with a stiff breeze, but I could see Mercury clearly sinking toward the western horizon. One thing I have found is that speed is of the essence when imaging Mercury.  The planet is usually low on the horizon when it becomes visible and it sets quickly. I set up, my hands rapidly numbing in the cold (you can't use gloves to set up a scope), and powered up the scope.

I found Mercury, centered it, and replaced the eyepiece with the imager (a modified Lifecam in an eyepiece tube). I had a tough job centering the planet in the field.  My ETX has some backlash problems and fine adjustments can be problematic.  In addition, I could not precisely polar align (no time and the pole star was not visible), so the planet drifted out of the narrow field of the imager rather quickly.  After 3 or 4 minutes, however, I had Mercury centered and roughly stable.  I hit the capture button on SmartCap and the program locked up completely.  I've never had that happen before, but it locked solid.  I had to manually power off the machine and restart it.  By the time the laptop came back up, the planet had drifted out of the field and I had to send more time recentering.  Focusing was hard with numb fingers and a bouncing scope.  The planet was twinkling viciously and the image in the scope was almost formless.  For some reason, the adjustment sliders stopped working in SharpCap, so I went ahead and captured a few hundred frames monochrome (SharpCap comes up with the saturation at zero). I restarted SharpCap and then took a couple of sets of color captures.  The first showed the pinkish color of the planet well, the second was overexposed, and SharpCap locked up again solidly and I was unable to adjust the image.  By this time, Mercury was very low and I decided to hang it up for the evening.


I should also add that the pleasure of the evening was greatly enhanced by juggling reading glasses, eyepieces, imagers and an autostar in a fresh breeze with a wind chill of 18 degrees.  I literally could not feel my hands by the time I was done.  I post the fuzzy, globby images here as a kind of memorial.  I will NEVER image Mercury again, unless it is in tropical climes looking out over a calm, sunset sea and with a suitable libation in hand.

Russian Meteor Strike

I do not usually post other news on here, but this is an exception. At 9:23 am this morning, local time, a large meteor fell to earth near the Russian city of Chelyabinsk.  It damaged building and set off car alarms.  Some spectacular footage of this event can be found here:

http://www.guardian.co.uk/world/video/2013/feb/15/meteor-shards-russia-explosion-video

Several explosions can be heard in some videos, especially in the last one, indicating the impact of multiple fragments.

There are many other videos on the web now; some show internal security cameras in offices as doors and windows are blown inwards.  The object was relatively smell, probably around 10 tons, but this event shows how devastating an impact by a large body could be.

Thursday, February 14, 2013

The Sun on February 13, Part III

Here's an inverted image of the sun on February 13.  Filaments show as bright areas and swirling around active areas is clearly visible.


The Orion Nebula--Photoshop Reprocessing Technique

This is a reprocessed image of the Orion Nebula I took last year.  I only managed to stack a few exposures due to both the weather and my inexperience in using a DSLR with a scope.  In the interim, I downloaded the free copy of an early version of Photoshop that Adobe kindly made available to everyone.  The reprocessed result is much better than the original and shows what can be achieved with a decent image processing package.  The weather has been particularly uncooperative this year and it has not been possible for me to take any images this year.  I hope things improve over the next couple of weeks.


I adjusted the histogram for the best black background and then boosted color information and did some smart sharpening.  The result was the blurring of the trapezium stars and a slightly hazier image, but I was able to pull out a lot more detail from the outer edges of the nebula. I also followed a Photoshop technique for shrinking bloated stars.  Here it is:

“Shrinking Stars” trick (from Jack attributed to Dan Verschatse):

1.                  Open the image file
2.                  Select > Color Range
3.                  Choose a bright bloated star
4.                  Exit Color Range
5.                  Select Modify Expand
6.                  Choose a reasonable expansion to include halos (say 8 to 10 pixels)
7.                  Set Feather to about 3 pixels plus or minus 1 pixel
8.                  Filter > Other > Minimize > radius (1 pixel) > OK

The original image as simply captured and stacked is below:


The sun on February 13--Part II

Even when it is quiet, the sun is a maelstrom of activity.  This inverted image was captured with a PSTDS yesterday.  I followed the workflow described in an earlier post to produce the final image.  Poor seeing masked a lot of the detail, but the image does give a sense of the awesome power of the sun, even when it is not highly active.


Wednesday, February 13, 2013

Spectacular prominence and linear feature

Seeing was very poor today, but I managed to capture an image of a spectacular prominence and a long, linear feature which I assume is a filament edge on.  A good focus was almost impossible to achieve the disk features were in constant motion due to unsteady air. I took the prominence image without the DS configuration. I did take one with the DS.  The image was brighter, but not as well-focused, so I did not use it. Other images in this post were taken using the SolarMaxII.

The images below show the linear feature with normal processing and inverted processing:


Tuesday, February 12, 2013

Solar Image Reprocessing--A New Workflow

Below are a couple of images I reprocessed using a couple of new techniques I learned about via the Yahoo PST group. I'm especially grateful to smerral who shared his Photoshop workflow which is used in the approach below.  As you can see, it makes for dramatic and rather artistic images; details are sharper and more distinct and you can really see the turbulent nature of the solar surface.


The technique is as follows:

I capture the images as monochrome in 1000 frame AVIs.  I stack them and wavelet process in Registax, stacking the best 200 frames.  I then import the images into Photoshop.  In PS, I use the Invert function to invert the images.  I then use the Deep Yellow filter (setting it to 85) to perform initial coloring.  I then crank up the red with the Color Balance function.  I use noise reduction and either sharpening or smart sharpening to produce the sharpest image with most detail (unsharp mask does not seem to work well on these images).  I then use the "replace color" function to create a black sky around the inverted image.  I may try this approach more often.

Monday, February 11, 2013

Jupiter--Reprocessing vs Overprocessing

The closest I can get to astronomy in the current cloudy weather is to reprocess some shots I've already taken.  This is yet another reprocessed image of Jupiter--this time with adjustments using smart sharpening, denoising, and levels/saturation adjustment in Photoshop. The differences in all these pix are fairly small, but you can see definite differences in the revealed fine detail.  The trick, from my perspective, is to avoid an "overcooked" look, which I see very frequently in processed planetary images.  I think the image below looks a little like a sketch done with pastel crayons.


The image below is one I consider to be "overcooked."  The processing has brought out more details, but the image looks very "digital" and has a number of sharpening artifacts.  For this image, I did heavy wavelet processing of the above image in Registax and then despeckled and denoised in Photoshop.


Saturday, February 9, 2013

Mercury, February 9, 2013

This is the first opportunity I have had in quite a while to see Mercury.  It's also a planet I've never imaged.  I  decided to try imaging this evening as the western sky was relatively free of clouds.  I drove to a site a little west of town and set up the ETX 125.  It was a cold evening and setup was far from fun, but after sunset, I was able to see Mercury quite clearly; I could not see Mars, which is quite close to it in the sky.  These two captured images are 600 frame captures, with the best 20% stacked.  The phase of the planet is clearly visible. Seeing was very poor and the planet was scintillating wildly.


PST Plus SolarMaxII ready for action!

This is a pic of the PST/SolarMaxII combo; it's just a record shot, but new visitors will note I have it on an old manual equatorial for a 60mm store-bought Bushnell refractor.  All my images are taken with manual tracking using the slow motion knobs.  I roughly align the mount to the north and it seems to work well for the relatively short exposures needed for solar work (a little more than 30 seconds for 1000 frames).  The SolarMaxII is a very worthwhile investment.  I notice a small loss in edge detail when I use it, but a huge increase in contrast and detail on the disk.  Note the red, plastic clothespin.  It is clipped to the scope's focusing knob and makes fine focus adjustment MUCH easier!


The Sun on February 9, 2013

Although there are no actively-flaring regions on the sun at the moment, the current active regions show interesting structures in H-alpha.  I also captured some long filaments and a loop prominence. Each image was captured with a PST/SolarMaxII and a modified Microsoft Lifecam.  1000 frames were captured for each image and the best 200 frames were stacked and processed (Registax 6).  Final finishing was done in Photoshop.
Active regions and filaments--AR 1665 and 1670 are particularly prominent

More filaments

 A slightly different perspective

A looping prominence

Friday, February 8, 2013

LXD-55 10 inch SNT rides again!

The 10 inch LXD-55.  The mighty 14 inch looms in the background under its cotton cover.
My old LXD-55 has been stored in the garage for a number of years, and they have not been kind to the scope. I'm putting it back into service as the 14 inch scope is moving to the new dark sky site son and I want a scope I can roll out of the garage on nights when a trip out to the observatory is impractical.

The first step was to remove and clean the corrector plate, which was much less challenging and scary than I had been led to believe (if you mark the scope and the plate for orientation, it's fairly easy).  I also made a wooden "wheelie" to make it easy to roll in and out of the garage.  This little platform was made from 2 x 4s and is essential to avoiding the long and rather difficult setup if I had to pull out the scope components separately (which I would otherwise have to do as the darn thing is so heavy).

There were three big challenges.  The cold had cracked the autostar hand controller case and the plastic cowl covering the declination motor had cracked and fallen loose, damaging the encoder disk for the motor. In addition, the plastic spreader on the tripod had also cracked and broken.  As you can see in the image, I made a replacement spreader from plywood and it seems to work pretty well.  As to the encoder, I removed the disk and straightened it as best I could.  I plugged in the scope and powered it up.  So far, so good.  But as I was checking it out, it began wild and uncontrolled slews on both axes. Powering down, resets, and new cables did not solve the problem.  I took the autostar into the house and opened it an cleaned all contacts.  I then updated it to the latest version.  I tried the updated unit on my ETX 125, but the random slews continued.  I completely reset the unit and the problem seemed to be solved.  I then plugges the autostar into the LXD-55.  It started slewing again. I reset the autostar, and it seems the problem is solved.  I trained the scope without problems.  The next test will be how badly the crushed encoder disk compromises tracking and GOTO performance.  I'll post more as I do additional testing.

Finally, the screws that hold the counterweights in place fell apart when I tried to use them.  I had to drill out the sad remains from from the counterweights and replace them with standard screws.

Optically, the LXD-55 is an excellent scope for deep sky imaging.  But the Chinese-built mount is a disaster of cheap "engineering."  The scope is to heavy for the mount and the mount itself uses too much cheap, soft "pot metal."  I performed a semi-'hypertune" on it a couple of years back.  We'll see how well it has held up when the skies clear and I can use the scope.

Thursday, February 7, 2013

The sun on 02/07/2013

After missing a 10 hour flare yesterday (how could I have??!!), I almost didn't image today.  However, I am glad I did as there were some nice prominences visible as well as filaments and decaying active areas.  The focus isn't what I would like it to be on these images; I think I did not have the imager seated properly and the focal plane was tilted. The horseshoe-shaped area to the left of the large filament is AR 1667, which was actively flaring yesterday.


Wednesday, February 6, 2013

The Sun on February 6, 2013

The weather finally cooperated today and I was able to take a few images with the PST and SolarMax II.  These images are 200 frame stacks from 1000 frame captures. Please excuse the hair or fiber on the upper left!


The Horsehead Nebula

This image of the Horsehead Nebula consists of just over 4 hours of total integration time. Stacked and processed in Siril, GraXpert, Affini...